ESP-IDF: TCP Server on ESP32
Introduction:
In IoT, it is important to connect two components using server. Typical way is to use HTTP protocol, because it is easy and became defacto standard. However in constrained edge devices like ESP32, each bit counts, hence we need to look for lighter server component . Essentially HTTP is an application layer which runs on top of TCP/IP layer. TCP is two layers below the application protocol and hence uses less resources. Thus using TCP/IP will be efficient way for making server. Other aspect is in case of HTTP , client is always browser. In IOT usecases,it is not necessary to have browser as an interface as two embedded devices may need to talk.

It’s amazing how this little devices can perform several roles. Though ESP32 might not be able to serve many clients at the same time ,it is good enough to provide a simple interface for tasks such changing the WiFi configuration or to view some readings device took using different sensors connected to it.
Objective : To run lighter web server using TCP/IP protocol on ESP 32 using IDF as programming language.
We have seen how to use ESP32 as a TCP client in the previous post. Similar to ESP8266 (NodeMCU) we can run TCP server in two modes. You can see more about running TCP server on NodeMCU in one my post on NodeMCU. If you are just getting started with ESP32, I recommend you this post first.
Solution Approach :
There are two different methods for hosting TCP webserver. Depending on the need, one can choose any method. Nevertheless, we shall cover both the methods in this blogpost.
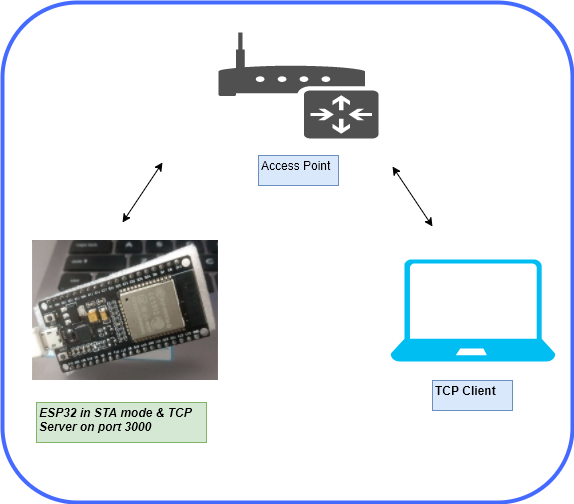
- ESP32 runs TCP server and provides a network for clients to connect (ESP32 will act as a access point)
- ESP32 runs TCP server and connects to a network we provide (ESP32 will act as WiFi client device and joins user specified network)
Base code for opening a socket and accepting connections remains same in both methods. We will use the socket API provided by lwIP (lightweight IP). We have all ready seen some the API in TCP Client post.
Solution Overview diagram
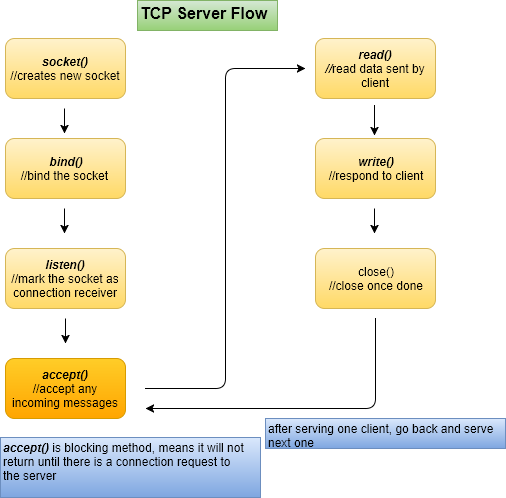
Create TCP Socket
socket(domain, type, protocol)
This step is same for both TCP client and TCP server.
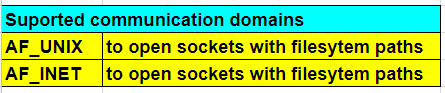
The first parameter is communication domain for which we are creating the domain, here it is AF_INET. Second parameter is socket type it can be SOCK_STREAM/SOCK_DGRAM/SOCK_SEQPACKET. Third parameter specifies the protocol (if we pass 0, lib will select the appropriate protocol)
Binding the socket
bind(socket,srvr_address,address_lenght)
bind() function lets us assign a local protocol address (here it is IP and PORT) to the socket
Start listening for incoming connections
listen(socket,backlog)
listen() function makes the socket as passive and ready for incoming connections, we have provide socket and backlog as arguments. The backlog argument indicate maximum number of requests that can be queued for this socket. If the queue exceeds this length, the new connection requests will be rejected.
Accept connection
accept(socket,client_address,address_lenght)
accept() is blocking method, it will not return until a new connection request is made. It will provide a new socket descriptor and the address of the client from whom this request came.
read from the socket
read(socket,buffer,size_of_buffer)
read function, read available data from the socket and returns the number bytes written to buffer
write to socket
write(socket,message,message_len)
write method accepts socket, message and length of the message (in the same order). It writes the given message to the socket
close the socket
close(socket)
closes the given socket
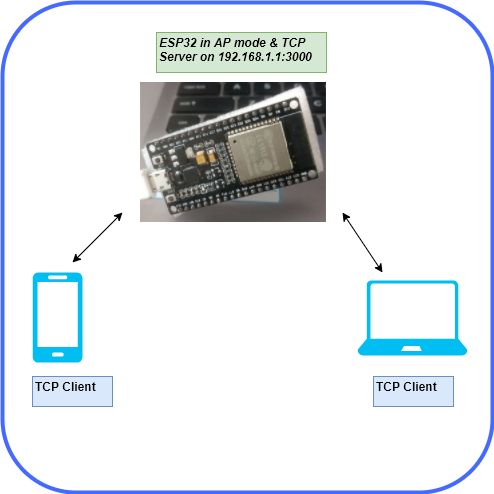
ESP32 : TCP Server and Access Point
In this mode ESP32 has to provide both TCP server and access point. You can check out this post on how to put the ESP32 in Access Point mode. TCP server will wait for the AP to start, once the AP is ready, it will open the port for incoming connections.
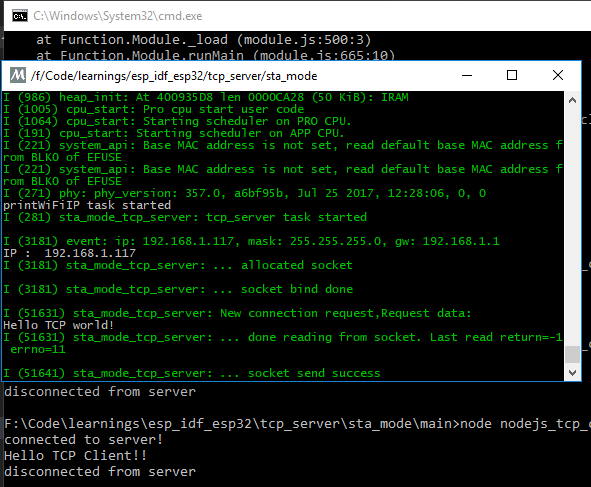
On every new request, ESP will print the request contents and responds with a “Hello World” message. This is not HTTP server, the response will be just a string not a html content.
To test the server we will use nodejs tcp client, it will open connection to (192.168.1.1:3000) and prints the received message. You need to connect to the AP created by ESP before testing the server
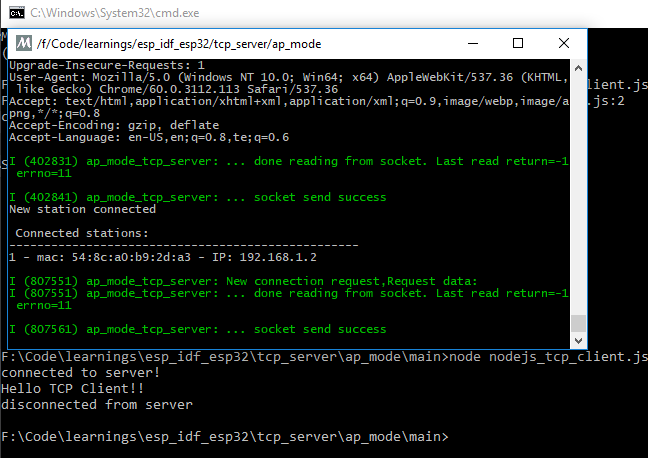
You can also send a request from browser to 192.168.1.1:3000, ESP32 will print the request content, but the browser will complain that received content is not HTML (we are not sending proper HTML content from server).
ESP32 : TCP Server and WiFiClient
In STA mode, ESP32 will first connect to a WiFi Access Point, then starts the server. ESP will print the IP it got from the router, we need this IP to make send message to the ESP.
The TCP Server code is will remain same for both the modes (instead of waiting for AP to start , here we will wait for IP from router). We will add the TCP server code to WiFi client connect code we developed in one of the previous post. Make sure to change to place the ESP IP in nodejs_tcp_client.js file before running it.
full code is available at this git repo
Conclusion :
Using ESP 32 as TCP as major advantage of using less resources as that of hosting HTTP webserver. The usecases that can make use of TCP server can be many. Comment your thoughts/questions on TCP server on ESP32


I used AP mode. I am always getting connection refused over tcp. I tested with android socket app, nodejs code in linux and python socket programs too..
Hi, make sure that the system is connected to AP created by ESP32. Please post the log printed on esp32 console ,and the program you are using to test the connection if thats ok with you
Heyy. Got it worked. Thanks. There was some issue from my side of code.
hi,
could anyone help regarding for the code.. mean i want to send the data from nodemcu(client) to another nodemcu(server) with tcp protocol by using lm35 with embedded c but i am very poor in programming langu. can anyone help me regarding the code..
Getting error while executing the code. ESP32 keeps restarting when I execute the code.
Here is the log:
I (356) cpu_start: Pro cpu start user code
I (39) cpu_start: Starting scheduler on PRO CPU.
I (0) cpu_start: Starting scheduler on APP CPU.
ESP_ERROR_CHECK failed: esp_err_t 0x1101 at 0x400d27ba
file: “/home/meet/ESP32_Applications/sample_apps/tcp_server/sta_mode/main/esp_sta_tcp_server.c” line 63
func: initialise_wifi
expression: esp_wifi_init(&cfg)
Backtrace: 0x4008d7a8:0x3ffbaef0 0x4008dc39:0x3ffbaf10 0x400d27ba:0x3ffbaf30 0x400d28c3:0x3ffbafa0 0x400d09de:0x3ffbafd0
Rebooting…
please add a call to nvs_flash_init()
“WiFi initialization function, esp_wifi_init, no longer calls nvs_flash_init internally. Applications need to call nvs_flash_init before calling esp_wifi_init”
https://github.com/espressif/esp-idf/releases
Hi,
Thanks for your help. As you suggested, I added the call to nvs_flash_init() before esp_wifi_init. I referred simple_wifi sample application for error handling of nvs_flash_init() call. And I also included the correspondig .h file for nvs_flash_init() API.
Now everything works as expected. Thanks a lot.
Can you show me where to add a call to call nvs_flash_init before calling esp_wifi_init”
hi i am working on esp32, for that i configured esp32 in AP mode. and i am trying to send message to esp32 by UDP connection but it is not able to recieve any message please help.
WiFi.mode(WIFI_AP);
WiFi.softAPConfig(apIP, apIP, IPAddress(255, 255, 255, 0));
WiFi.softAP(“ESP_WIfi”);
Serial.println(“Created Hotspot”);
dnsServer.start(DNS_PORT, “*”, apIP); /// IPAddress apIP(10, 10, 10, 1);
webServer.begin();
webServer.handleClient();
Serial.println(“Hotspot up & running.”);
Udp.begin(localUdpPort);
//i am trying to send message to the 10.10.10.1 Port:3200, but it not recieving any message y. in esp8266 it is working fine.
Hi, I cant get the IP from the router. Stuck at the task of “tcp_server task started”.
Hi,
You might be using ESP32 in AP mode, In this mode ESP32 will act as access point, it won’t connect to router. use it in STA mode if you want it to connect to router
add on ,
I found that I loop at the case of SYSTEM_EVENT_STA_DISCONNECTED. Is it my connection connect wrongly?
Thanks for the reply.
Yeap, I using the STA mode. But, i still stuck on the question i asking previously. Here is the console output
I (0) cpu_start: App cpu up.
I (383) heap_init: Initializing. RAM available for dynamic allocation:
I (390) heap_init: At 3FFAE6E0 len 00001920 (6 KiB): DRAM
I (396) heap_init: At 3FFB8E00 len 00027200 (156 KiB): DRAM
I (403) heap_init: At 3FFE0440 len 00003AE0 (14 KiB): D/IRAM
I (409) heap_init: At 3FFE4350 len 0001BCB0 (111 KiB): D/IRAM
I (415) heap_init: At 40090F00 len 0000F100 (60 KiB): IRAM
I (422) cpu_start: Pro cpu start user code
I (104) cpu_start: Starting scheduler on PRO CPU.
I (0) cpu_start: Starting scheduler on APP CPU.
I (211) system_api: Base MAC address is not set, read default base MAC address f
rom BLK0 of EFUSE
I (211) system_api: Base MAC address is not set, read default base MAC address f
rom BLK0 of EFUSE
I (331) phy: phy_version: 4100, 6fa5e27, Jan 25 2019, 17:02:06, 0, 0
print_WiFiIP task started
I (411) sta_mode_tcp_server: tcp_server task started
Hi,
I found this post very useful. as explained, I followed the steps and it works perfect. I have a question. here every time I need to check the IP add of the Server (ESP32) manually and then enter on my browser to interact with the server. This is because of DHCP on running router to which ESP32 server is connected every time. Is there a way where such as any fixed name of the server (similar to DNS) and the name will get resolved into the current ip address assigned to the ESP32 server? This way changing nature of ip address can be handled.
Thanks
Gyanesh
Give static ip to esp32
Thanks for this blog. here I can find that TCP Server only sending data to clients. But if Clients want to send data to TCP Server then how can we do it? can you put some light on this? if is there any git repos (ESP IDF) for that then it would be good for me. Thanks again for your support.
I mean I can receive “Hello TCP Client!!” but from the client (Android App) I can not send the message to the TCP Server(ESP32)
yeah I commented one line and now I can send data from client to server but server now stops sending. I want a solution like Client and Sever can communicate with each other independently. If Client want to send data then it can send and if Server want to send data then also it can send. Hope you understand my point.
The example provide closes the connection once the message is sent. You need to keep connection open if you want to communicate at later