Make your own Google Assistant – Turn your home into Smart Home
Introduction:
Sometime ago, PDA personal digital assistants became popular before mobile wave came. Now it is time for SDA (smart digital assistant) On Oct 4, Google launched Google Home mini and Max speakers which make use of Google assistant at background. From tomorrow Oct 19, these speakers are available for sale in 7 countries costing 49 USD.
Google is little behind the race as Amazon launched similar Echo series speakers a year ago. Now Google is getting siri-ous and Echoed other competitors. Microsoft is also in fray with Cortana. In addition hardware vendors like Samsung and Sonos are in the SDA race.
In this blog, we shall see how to make a similar SDA from Raspberry Pi.
Required items:
Hardeware:
USB Mic
Speakers (3.5 mm or HDMI)
LED (to mimic smart home devices)
Of course, Raspberry Pi
Software:
Google Account
Node js
Python (preferably anaconda environment)
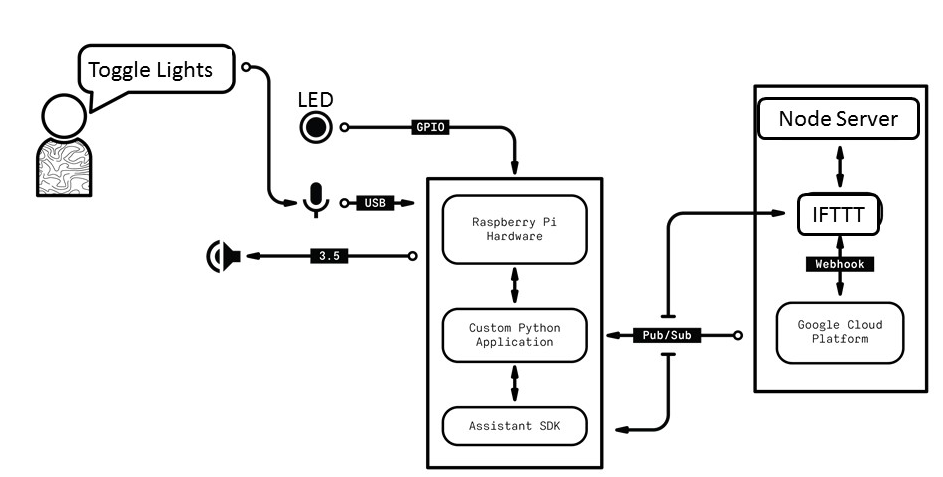
Architecture Diagram:
This architecture diagram depicts the input from the user via mic and GA processes it, IFTTT receives the htoword and triggers the Node server command, which calls python program to turn on or off the LED. However architecture is flexible in a way that each component can work independently as well. That means, node server separately trigger LED, Python program separately trigger LED.. and also they work together as well.
Steps:
- Setting up microphone and Speakers for raspberry PI
- Setting up Node js and python in Pi
- Setting Google assistant API
- Circuit and LED toggle
- Setting up actions using IFTTT and ngrok
- Integrate and test
Step 1: Setting up Mic and speaker:
Raspberry PI does not have inbuilt microphone to capture voices. So let us use USB microphone to get the voice commands. I used this one bought from Amazon India costing 680 rupees.
From the raspberry pi terminal, type the below command to list the audio capturing devices.
arecord -l
Please check the device id from the command. It will be like USB PnP sound device. By default in built sound card will be o, this new USB mic will have card number as 1 and device id as 0.
Other way to check this is to give below command
alsamixer
This opens the window, where one can see USB PnP sound card
Since it is new card, we need to modify the default sound configuration file
edit the existing sound configuration file by typing command
sudo nano /etc/asound.conf
Based on configuration, if anyone uses more than one devices, just find card number and device number and modify this file under mic. Here I sued pcm”hw:1,0″
copy the same file to /home/pi as well
Now check the setup by recording sample and confirm microphone is working
arecord –format=S16_LE –duration=5 –rate=16k –file-type=wav out.wav
After recording playback the recording by typing command
aplay out.wav
Check the speaker by typing command
speaker-test -t wav
Step 2: Setting up python and nodejs environment
Give the below commands from home directory (/home/pi) one by one
Step 3: Enabling Google assistant cloud project
In this step, we shall create google assistant client id and credentials from Google cloud platform
From Google Cloud platform (GCP), create a new project, store the project id. Then connect to Google Assistant API from API Manager , after that enable the activities web, app, device and voice.
Then get the credentials from OAuth screen. Download the JSON file that stores the OAuth key information and transfer it to raspberry Pi.
Then run the below command
(genv) google-oauthlib-tool –client-secrets “PATH_TO_YOUR_JSON_FILE“ –scope https://www.googleapis.com/auth/assistant-sdk-prototype –save –headless
headless need to added if you are running from remote ssh terminal.
After this you will re-direct a permission page, where one has to give “allow” permission.
Step 4: Connecting LED. In raspberry PI GPIO pin 23 need to be connected to positive leg of led and ground of led to ground pin Raspi
Check LED is working or not by running this script
Step 5: Setting up IFTTT and ngrok
In this step , we need to run node server which will listen on a specific port . I used the code from KylPeacock.
This script internally invokes the above python script to turn on or off the LED using python-shell command.
However Node server is running on local instance, while Google assistant is running on cloud. so we need to get internet URL.
I used ngrok to get the IP address by typing below command, which will provide internet IP address.
./ngrok http 8000
Now Google assistant need to invoke this URL whenever key word (like Toggle lights) is said. For this we will use Webhook to assign trigger and action. Login into IFTTT website, choose google assistant , then choose say a simple phrase, after that choose webhook for making trigger
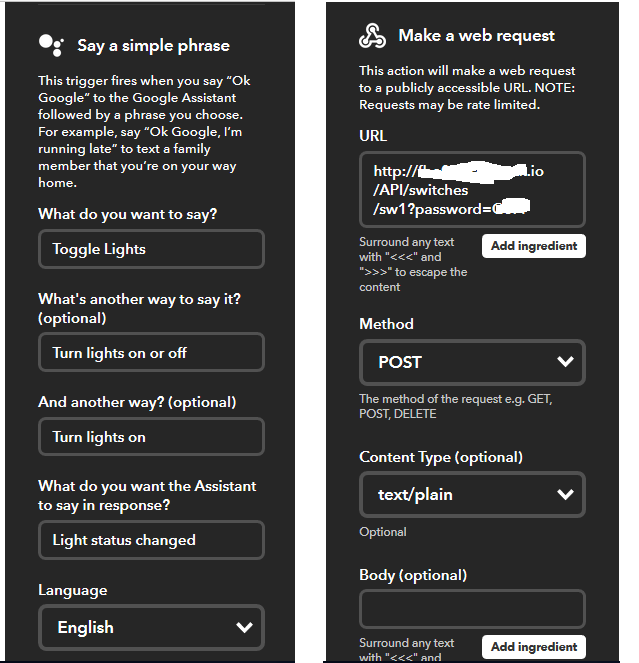
Click save .
using postman, one can test whether LED is changing status by running this URL.
Step 6
Integrate all and test – LED, speaker, Microphone, Node server, IFTTT, Google assistant by issuing this command
python -m googlesamples.assistant.grpc.pushtotalk
This is the output from the command prompt when “Toggle lights” is said
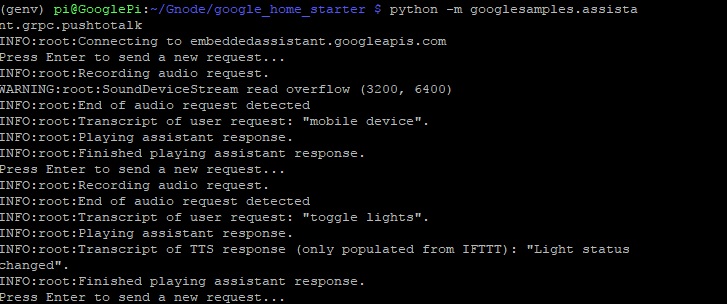
Other advantage of using Google assistant is any device that runs Google assistant can control this device now. For example, I ran the command from my mobile phone, to get the same result

Next steps:
Since we are able to control remotely LEDs, we can build many such assistant programs
For example, I am planning to build Talking mirror – which I will use to deliver news items while I am shaving.
Or build many transactions like Reservations, room booking, ordering a cake etc.. are the other possible usecases for this assistant.
Google suggests to build actions from Dialogflow,or actions SDK which will be used in such complicated solutions.
What are you going to build ?
In India, Google Home Mini is not yet available, however they are available in 7countries from last week.
References:
https://github.com/krpeacock/google_home_starter
https://becominghuman.ai/turn-your-raspberry-pi-into-homemade-google-home-9e29ad220075
https://www.hackster.io/Salmanfarisvp/googlepi-google-assistant-on-raspberry-pi-9f3677#toc-step-1–setup-raspberry-pi-1
https://developers.google.com/actions/dialogflow/
http://gadgets.ndtv.com/videos/google-home-mini-hands-on-does-it-work-in-india-470137
About The Author
Sivaiots
Enterprise Architect , Tinkerer