NodeMCU/ESP8266 based Intruder detector
In this blog we will build Intruder detector using NodeMCU/ESP8266, more of like a burglar alarm. We will be using a IR reflection based sensor. The sensor working is very simple, it will give output of 5v if there is reflective surface in front of it , 0v if there is no obstacle. You can use a PIR sensor or any obstacle/motion detection sensor, the same code will with PIR as well. For that matter you can use any digital sensor.

Once the motion is detected there are several ways to transfer the information to the clients. We can build a Android app that can give notification whenever there is a motion detected or we can send a mail , for now we will see how to send a mail to the given email id.
NodeMCU setup:
if you haven’t setup your nodeMCU, follow this blog. The idea is, we will monitor the IO line for configured time and send a notification only if the IO line is stable in that period, this is to avoid false triggers.
Node RED Flow:
We will be using MQTT to transfer the information to a Node-RED server. Node-RED server will receive this messages and send an email to the interested parties.

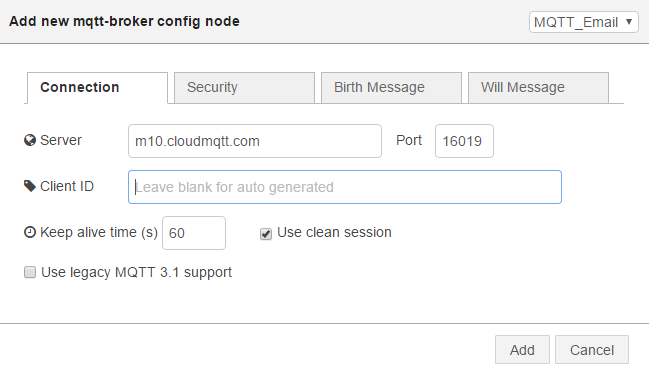
Configure mqtt node with the MQTT broker and channel details. You can create a MQTT broker by following this blog. You need to fill both server and security tab (Replace server and port with your values,you can ignore the Client ID)
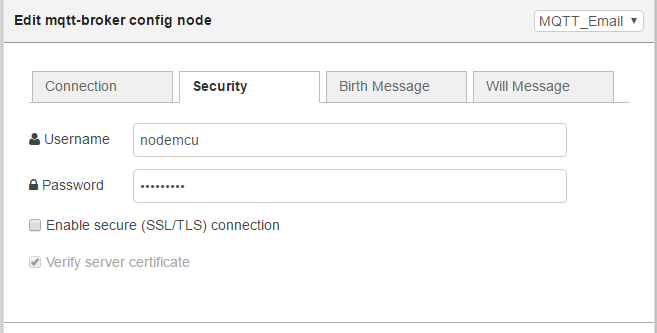
Replace with your username and password
NodeMCU will post messages to the following channel,
/node/v1/{chip id}/bin/fromnode
The messages will be in JSON format.
{“p7″:[1,1],”p6″:[1,1],”p5″:[1,1],”p4″:[1,1],”p2″:[1,1],”p3″:[1,1],”p8″:[0,0],”p1”:[0,0]}

The message contains the present status and past status of the IOs. JSON messages will be sent even one IO status is changed, So we need filter the messages. We can do that with the help of function module. I connected sensor to GPIO 1 , so I will be checking the status of “p1” , we will send email only if the past status is 0 and present status is 1 , if your sensor is active low you need reverse the check.

node.log(msg.payload)
var payload=JSON.parse(msg.payload)
node.log(payload);
if(payload.p1[0]===0 &payload.p1[1]===1 ){
  msg.payload="Intruder detected";
  node.log("Intruder detected");
  return msg;
}

return null;
add the details for email node as shown here. and finally add couple of debug nodes so you can see whats going on.
Testing:
You can deploy the flow once you have add the required details to nodes. The nodemcu code is available on GitHub, you need to add the Access point and MQTT broker details in the config.lua file and flash all the files to NodeMCU. NodeMCU will send message only if the signal is stable for at least 5 seconds (this can be configured in config.lua).


