Temperature Controller using Raspberry Pi and Arduino
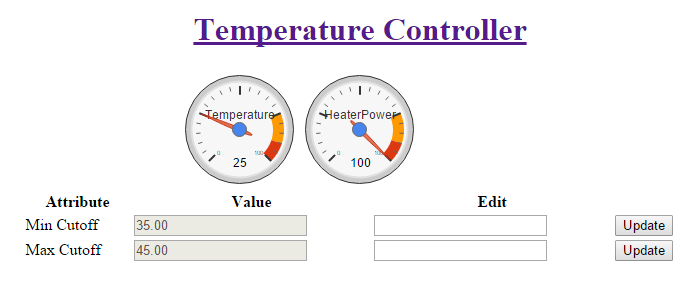
In this blog I will show you how to develop a heater control system(On/Off controller). We will also develop a web interface from which you can see the current temperature and control the some parameters like what will be min allowable temperature. The circuit will try maintain temperature in between set limits (minimum temperature and maximum temperature). if temperature drops below the minimum level then heater will be turned on, if temperature reaches the maximum level heater will be turned off. You will be able to adjust these two parameters from a web page.
we will use SerialPublisher driver to provide communication between Raspberry Pi and Arduino UNO. Download SerialPublishSoft and place in your Arduino library folder. Upload the following sketch
/*
This program will control the heater based on the
inputs from RaspberryPi.if temperature is more
then maxTemperature heature will be turned off,
if the temperature is less than minTemperature heater will be turned on
*/
/*
This program will control the heater based on the
inputs from RaspberryPi.if temperature is more
then maxTemperature heature will be turned off,
if the temperature is less than minTemperature heater will be turned on

*/
#include <SoftwareSerial.h>
#include <SerialPublish.h>
#define tempPin A0
#define heaterPin 4
#define ledPin 13

SerialPublish pi(2,3);//rx,tx
float maxTemperature = 60, minTemperature = 50, heaterState = 0, ledState = 1, temperature;

void setup()
{
 Serial.begin(9600);
 Serial.println("Serial publish example");
 pinMode(ledPin, OUTPUT);
 pi.publish("T", &temperature);
 pi.publish("minT", &minTemperature);
 pi.publish("maxT", &maxTemperature);
 pi.publish("heaterS", &heaterState);
 pi.publish("ledS", &ledState);
}

void loop()
{
 temperature = ((5.0 * analogRead(tempPin) * 100.0) / 1024);
 if (temperature > maxTemperature)
 heaterState = 0;
 else if (temperature < minTemperature)
 heaterState = 1;

 digitalWrite(heaterPin, heaterState);
 digitalWrite(ledPin, ledState);

 pi.sync();
}
Now on Raspberry Pi we have to setup a web server to serve web pages. If you haven’t it already you can follow Setting up Python webserver guide to setup web server. if this is the first time your using the serial port of Pi you may need to disable the port. follow this guide to Disable Serial Port the Serial port.
sudo pip install pyserial
cd ~
wget http://icircuit.net/mydownloads/TemperatureContollerPi.zip
unzip TemperatureContollerPi.zip
cd TemperatureContollerPi/
sudo python TController.py
I have removed the css on Pi version of project you can add them back if you want. you can get complete version form here. The TController.py contains the routing infromation and templete folder contains the html pages.I have forwarded all the requests from clients to the Arduino to get the values. This is ok if you one or two clients. If you more clients accessing the service you might want to cache the results form Arduino and serve the cached results to the clients.
The same python code you can run on windows machine as well. just change the Serial port name in TController.py file.


Hi
if i want to make this project using MQTT protocol
and my controllers
ESP32 & Raspberry Pi
so i will change the communication protocol from SerialPublisher to MQTT i need support urgently