Arduino: ESP32 Based Boiler Controller – Iteration 2
In this post we will try implement the second iteration solution that we discussed in previous post. Read the previous post for setup instructions. In first iteration we did not had having any intelligence in the system. It just moves data from the controller to UI and from UI to controller using MQTT. In this iteration we will automate boiler using high cutoff and low cutoff. In next iteration the decision will be taken by ESP32 itself.
User need to provide higher cutoff and lower cutoff values. Server will switch off the boiler if the temperature goes beyond higher cutoff. If the temperature goes below lower cutoff, boiler will be switched on
High Level System Architecture
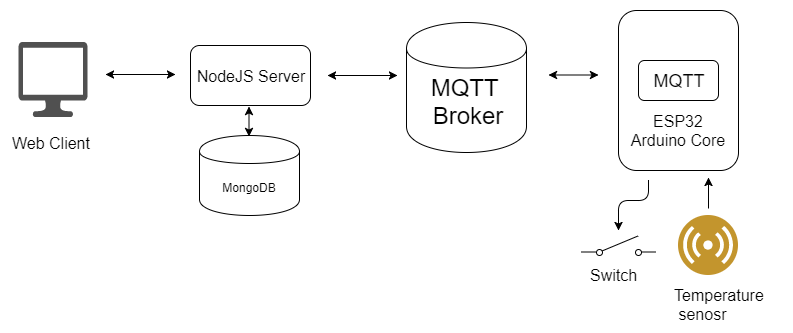
ESP32 will send readings periodically on topic /ic/ha/from/esp32/ and will be listening on topic /ic/ha/to/esp32/{id} for heater control commands. In second iteration we also added concept of device id. Using device id we can identify a particular boiler in cases where there are multiple boilers. (In this case I hard-coded the id in the code, generally it will calculated based on some sort of permanent id of the chip like MAC. It can also be stored when the device is provisioned )
Every reading sent by ESP32 will have id field as well
{"tSensor":332,"realy":0,"id":367}
Remaining messaging format remains same as that of previous iteration.
In this iteration we introduced a nodejs server which will store the temperature readings in the mongo db. The server will also store the higher cutoff/lower cutoff for each boiler.Currently I am storing all the readings in single document, if you are planning to use it in some sort of production, you need to consider some sort of cleaning up or create a new document for every reading.
if(temperature > hc && relay){
  let message = {switches:[{status:false,id:1,lable:'Relay'}]}
  publish(chnl,message)
}
if(temperature < lc &&!relay){
  let message = {switches:[{status:true,id:1,lable:'Relay'}]} //switch on realy
  publish(chnl,message)
}
When ever there is a new reading from ESP32, Server will compare it with set points and switch on/off the boiler.

How to test
open boiler_itr2.ino file in arduino IDE and update SSID and password. SSID is your wifi name and password is your wifi passwrod. Load the file to ESP32 and open serial console. ESP32 will print the IP address once it is connected to WiFi. It will also starts printing the sensor value once it is connected to MQTT Broker.
start mongodb server
open command prompt and navigate to boiler_itr2_server and run the following cmds
npm install

node prepare_db.js

npm start
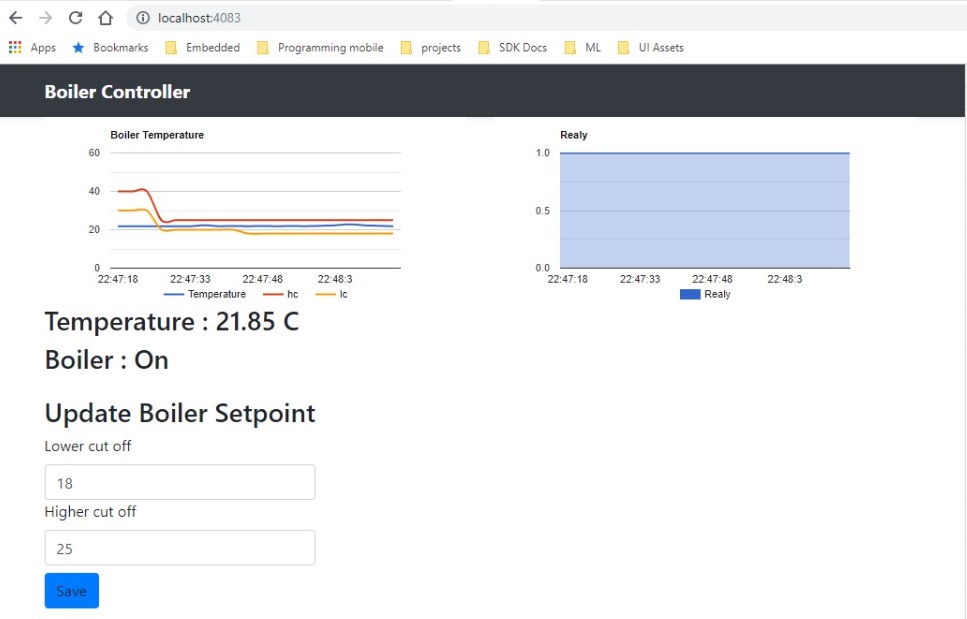
open browser and navigate to localhost:4083, you should see something like the following. You can see that we added a form to accept set points form user


Hello j, try to make it work “https://icircuit.net/arduino-esp32-based-boiler-controller-iteration-2/2595”. Everything works fine I do the commands npm install (o vulnnerabilities), node prepare_db ( Connect to MongoDB), npm start (node ./bin/www,running to app on port 4083, listening on port 4083, connected to MongoDB)
In my browser at localhost address: 4083 I always receive “{” success “: false,” message “: {” status “: 404}}” and in my visual studio terminal:
“error: message = Not Found, stack = Error: Not Found
at C: \ Users \ Norbert \ Documents \ PlatformIO \ Projects \ nb_boiler_3 \ boiler_itr2_server \ app.js: 43: 13
at Layer.handle [as handle_request] (C: \ Users \ Norbert \ Documents \ PlatformIO \ Projects \ nb_boiler_3 \ boiler_itr2_server \ node_modules \ express \ lib \ router \ layer.js: 95: 5)
at trim_prefix (C: \ Users \ Norbert \ Documents \ PlatformIO \ Projects \ nb_boiler_3 \ boiler_itr2_server \ node_modules \ express \ lib \ router \ index.js: 317: 13) ……
Could it be possible that there is a missing file which generates the web page
Thank you..
Norbert
Hey, you are right, a folder is missing. Please try now. I updated the repo