Arduino: ESP32 Based Boiler Controller – Iteration 1
In this post we will try implement the first iteration solution that we discussed in previous post. Read the previous post for setup instructions. In first iteration we won’t be having any intelligence in the system. It just moves data from the controller to UI and from UI to controller using MQTT.
High Level System Architecture
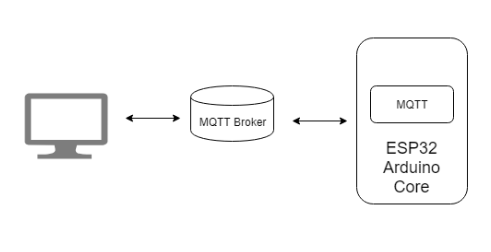
ESP32 will send readings periodically on topic /ic/ha/from/esp32/ and will be listening on topic /ic/ha/to/esp32/ for heater control commands.
The readings sent by ESP32 follows this format
{"tSensor":332,"realy":0}
we have two fields one indicating the raw reading for analog pin to which we connected the temperature sensor (GPIO 32) and the second indicating the present heater status (connected to GPIO 4).
Heater control message follows below format, gpio id 4 is mapped to id 1, if the status is false ESP32 will put the GPIO to Low and if status if true GPIO will be put to HIGH
{"switches":[{"status":false,"id":1,"lable":"GPIO 4"}]}
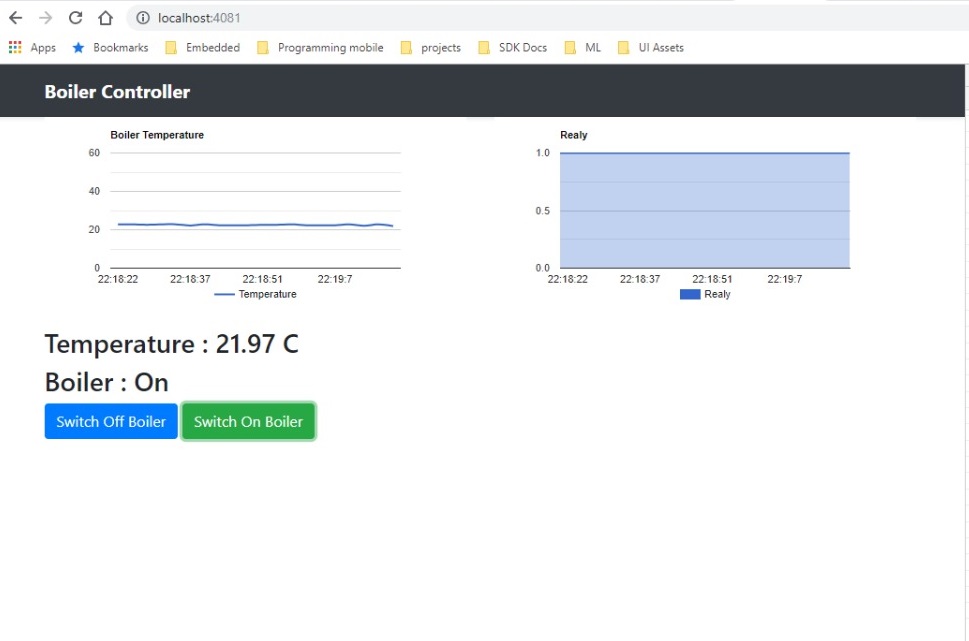
We will have a web page to visualize the data
I am using eclipse public MQTT broker, if you have access to private broker change the hostname and port, if it is protected by user name and password you need to provide that as well (The change has to be done in both arduino code and webpage java script)
Arduino Code
We initialize all the modules in the setup method like connecting to WiFi, Connecting to MQTT Broker, setup the IO pins
In Main loop we send a reading to MQTT broker every every 3 seconds (configurable)
Web App
All the setup is done in index.js. Once the script is loaded we connect to MQTT broker and subscribe to the channels. When ever there is new message on channel we parse it and update the graphs and other UI elements. ESP32 only publishes raw sensor readings, we need to convert it to temperature, that is also done in this script
How to test
open boiler_itr1.ino file in arduino IDE and update SSID and password. SSID is your wifi name and password is your wifi passwrod. Load the file to ESP32 and open serial console. ESP32 will print the IP address once it is connected to WiFi. It will also starts printing the sensor value once it is connected to MQTT Broker.

open command prompt and navigate to boiler_itr1_server and run the following cmds
npm install

npm start

Now open browser and navigate to localhost:4081 , you should see something like the following, you can switch off/on the LED by clicking on the respective buttons.