Getting started with Raspberry Pi Pico – MicroPython and C SDK
Raspberry Pi Pico is a low cost 32 bit ARM Development board from Raspberry Pi. The Raspberry Pi Pico has a RP2040 microcontroller and 2 MB flash. There is another version of this board called Pico W, which supports both WiFi and BLE. In this post we will how to set up development environment for Pico and flash blinking LED program. Raspberry Pi provides support for C SDK and MicroPython, there is also community support for Arduino IDE. The setup is same for Pico 2/Pico 2W, just need to select appropriate binaries and board while compiling/flashing the code.
Features
- RP2040 microcontroller – Dual core ARM Cortex M0+ @ 133 MHz
- 264 KB on chip SRAM, 2 MB QSPI onboard flash
- WiFi and bluetooth support (only Pico W board)
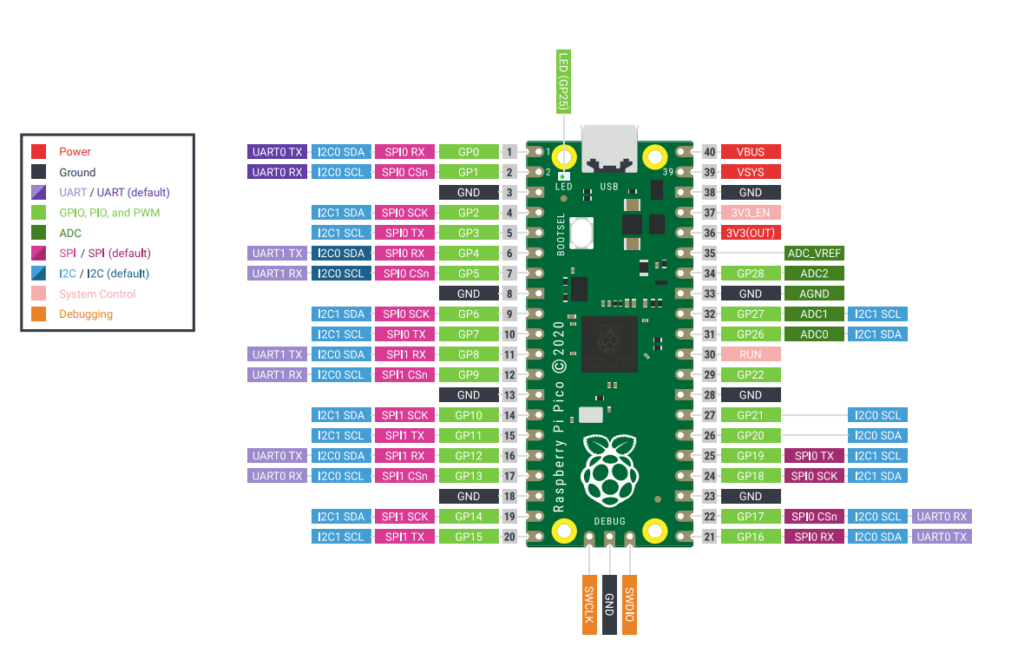
- 26 GPIOs (3 pins can act as ADC inputs)
- 2 UARTs, 2 SPI Controllers, 2 I2C Controllers, 16 PWM Channels, 8 PIOs
- USB Host and device support (USB 1.1)
Setting up MicroPython development environment
RP-series controllers have officially supported MicroPython port. MicroPython is a Python implementation for resource constrained devices such as microcontrollers. Loading MicroPython on to Pico is simple and straightforward, download the pre-build binaries from MicroPython download page. Download the latest version, at the time of this writing the latest version is 1.24.1, So I downloaded that. Now we need to upload this into Pico flash. Press down the BOOTSEL button and connect the Pico to host computer (if the Pico is already connected, then disconnect first), release the button after connecting Pico to the computer. Now Pico will appear as storage volume.
This means Pico is ready to receive the micro python binary file, drag & drop the download binary or you can also copy and paste the binary in this volume. Once pasted, Pico will automatically reset and connects to the computer as serial device, find the COM port from device manager. This procedure can be used for loading MicroPython binary on to any Pico series board (Pico, Pico W, Pico 2, Pico 2W), just make sure to download the correct binary from micropython download page. The procedure should also work for most the RP2040 or RP2350 based development boards.
MicroPython has REPL similar to the regular Python implementations. We can access the REPL from serial terminal.
Accessing MicroPython REPL from browser
open the this link in a chrome or edge browser and click on connect to select the com port. Once the port is connected, you should see following prompt.
Accessing MicroPython REPL using putty
putty is a popular SSH client for windows. putty can also act as terminal emulator. Download latest version of putty from here. Run the putty and select Serial connection type (by default it will be in SSH mode). Then provide the COM port and baud rate as shown below (COM port number will be available in the device manager as shown above).
Setting up Thonny IDE from MicroPython
There are few IDEs that support MicroPython such as Mu and Thonny. Lets see how to setup thonny IDE. Download and install latest version of thonny from thonny website. Run the thonny application and select the board from bottom environment menu item.
Thonny allows execution of file contents on Pico directly from the IDE (no need to copy paster in REPL), we can also save python files directly on Pico flash memory.
Blinking LED using MicroPython
Raspberry Pi Pico has on board LED and it is connected to GPIO 25. The GPIO can be controlled using MicroPython pin interface. For example to switch on the LED, use the following code snippet.
from machine import Pin
led = Pin("LED", Pin.OUT)
led.value(1)
To switch off the LED, we can pass 0 to the value method. Pin interface also has toggle method, which will change state from 0 to 1 or 1 to 0 when executed. We can use this method to blink the LED. In the following code snippet, we defined led_blink method that will accept number blinks and delay between each toggle as parameters. It will switch off the LED once the blink loop is completed using the value method of the Pin interface.
from machine import Pin
import time
def led_blink(number_of_blinks,delay_ms):
    led = Pin("LED",Pin.OUT)
    print("Starting...")
    for i in range(number_of_blinks*2):
        led.toggle()
        time.sleep_ms(delay_ms)
    led.value(0)
    print("LED Blink completed")
led_blink(10,500)
Setting up SDK based development environment
The SDK allows write programs in C,C++ and in ARM assembly. It provides headers, libraries and build system to write programs for RP2040/RP2350 microcontrollers. The SDK provides both low level hardware access and high level libraries to develop different sort of applications.
Raspberry provides a Visual Studio code plugin(VS Code) for seamless development flow, VS code is a popular editor from Microsoft. Download and install VS Code for your operating system from download page.
For linux and mac we need to install few additional dependencies before installing the plugin.
For linux
sudo apt install python3 git tar build-essential

For mac
xcode-select --install
Open VS code and click on extensions menu item on sidebar and search for “Raspberry Pi Pico”. Click on install button of the extension from Raspberry Pi.
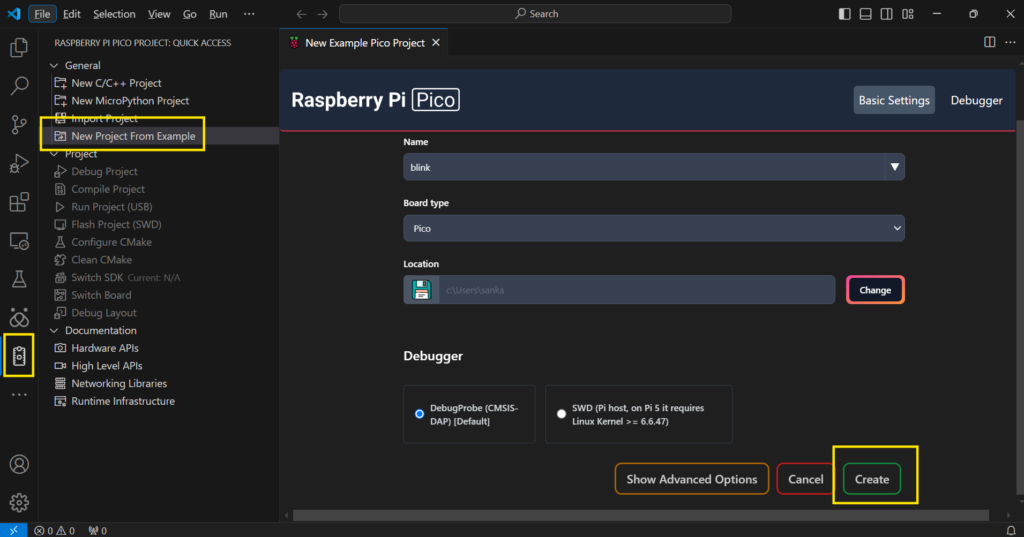
Once the extension is installed, a new sidebar menu called “Raspberry Pi Pico Project” will appear, the extension allows us to create a project from example projects. To create blinking led project, click on the new menu item and select “New Project From Example”. Select blink example from Name dropdown, we also need to select appropriate board from the Board type dropdown. We can also specify a location to store the newly created project. Click on Create button, it can take upto 10 minutes for setting up the first project. Don’t close the VS code window until the project is ready (installing the extension doesn’t install the SDK, SDK will be installed on the first project creation. The extension is still in beta, there seems to be some rough edges. I had to try couple times to get the project created).
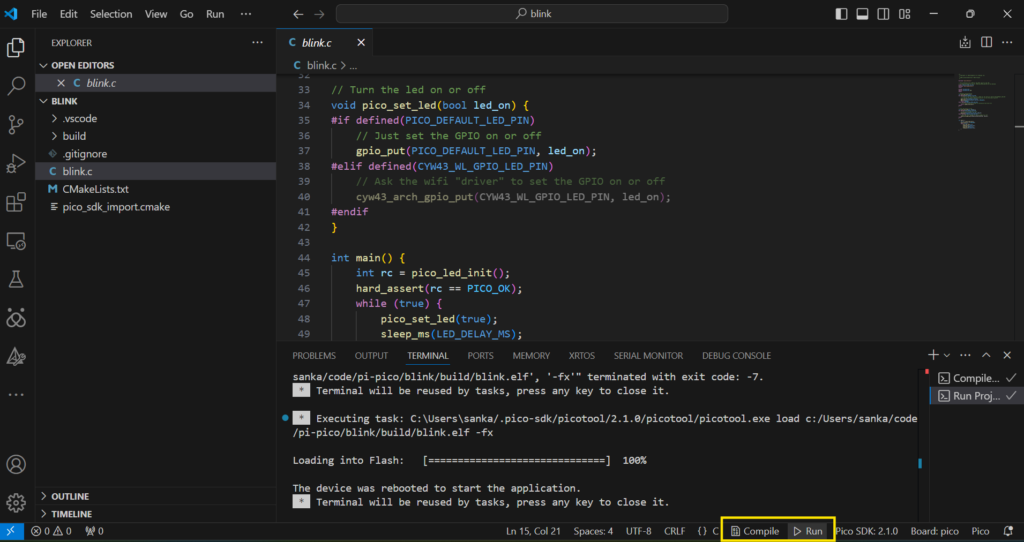
Once the project is ready, VS code will prompt you to trust the authors, click on Yes. You can see blink.c in the left side file explorer section. The extension also adds compile and run options at the right bottom section of the VS code. Click on Compile and then Run button (before click on Run you need to connect Pico to the host computer in BOOTSEL mode. Press down the BOOTSEL button and connect the pico to computer then release the BOOTSEL button, this process needs to be done every time you want to update flash new code to Pico)
Once you click on Run button, if the board is connect in BOOTSEL, you should see log in the terminal similar to the above and blinking LED on the Pico.


