Setting up arduino to program ESP 32
Note : This blog was written for old version of arduino esp32 core, current version setup is simple, get latest version of arduino and
add https://dl.espressif.com/dl/package_esp32_index.json to
preferences (File-> Preferences) , then open board manger (Tools-> Board-> Board manager), you should see ESp32 and click on install

Don’t follow below steps if you have done the above
In this post we will see how to add ESP 32 to arduino IDE (on windows machine) , this post assumes that you already have Arduino IDE installed on your windows machine (you can get latest version of Arduino IDE from arduino.cc )
Installing the ESP32 Arduino Core
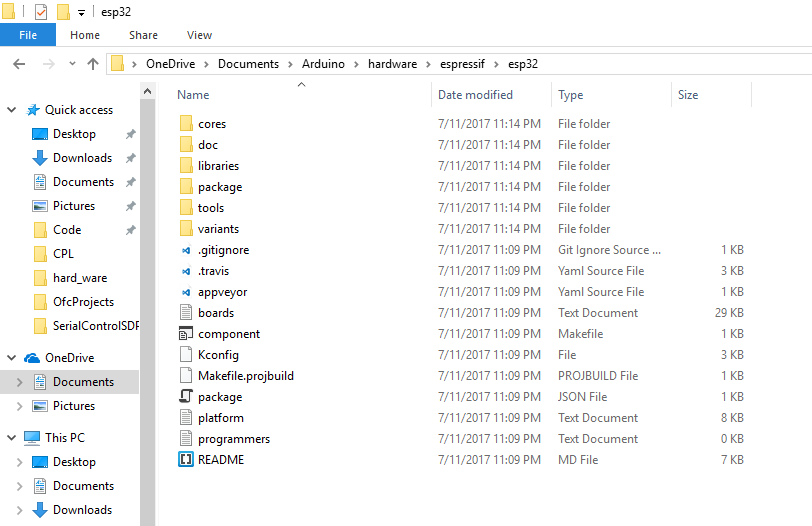
download the git repo and extract the contents to ${Sketchbook}\hardware\espressif\esp32 directory (generally the sketchbook folder is ~/Documents/Arduino, you can check in the Arduino IDE File->Preferences. Create the directory structure in your sketchbook directory,After extracting the contents should be in esp32 folder, not in its child folder, refer below images)

In the tools directory, you can find get.exe, double click on that. It will download the required files

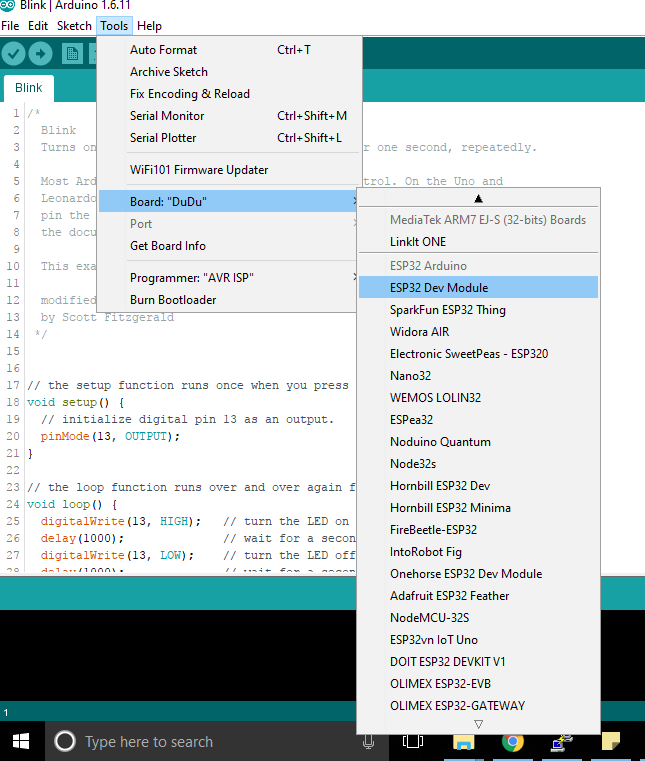
once the download is completed, restart your arduino you can see the ESP 32 boards in the available boards list
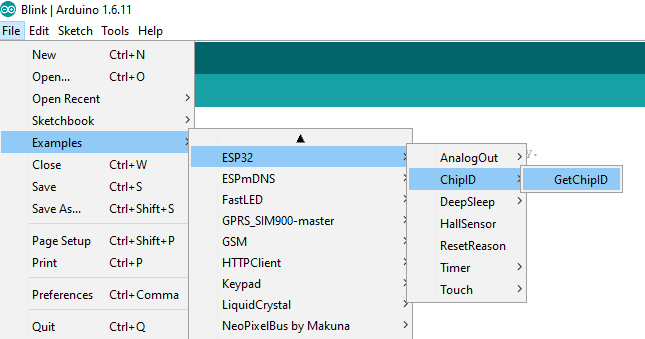
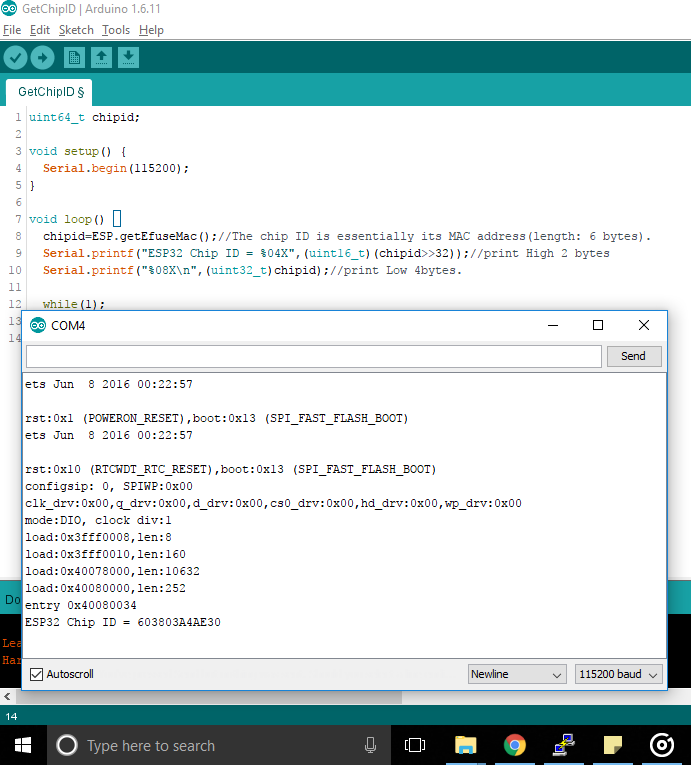
I will load a simple program that shows the CHIP ID of the device , you can find the program in arduino examples
upload the code and open the serial monitor
ESP 32 DevKit pin mapping

pd: Pulldown
pl: Pullup


thanks for the tutorial. When GetChipId is compiled , the following error message came.
exec: “C:\\Program Files (x86)\\Arduino\\hardware\\espressif\\esp32/tools/xtensa-esp32-elf/bin/xtensa-esp32-elf-g++”: file does not exist
Error compiling for board ESP32 Dev Module.
In the path given in error message, both / & \ are there. Is it the problem? where shall I change the settings, to compile the code correctly.
OS is W7ProSP1, Installed latest ARDUINO1.8.5 & git tools
the git repo should have been extracted to your Documents\Arduino\hardware\espressif\esp32 directory (Documents\Arduino folder is where you generally place your arduino external libs)
It seems I extracted into wrong folder. Reinstalled everything, took care about path as you pointed, It is working now. Thank you.
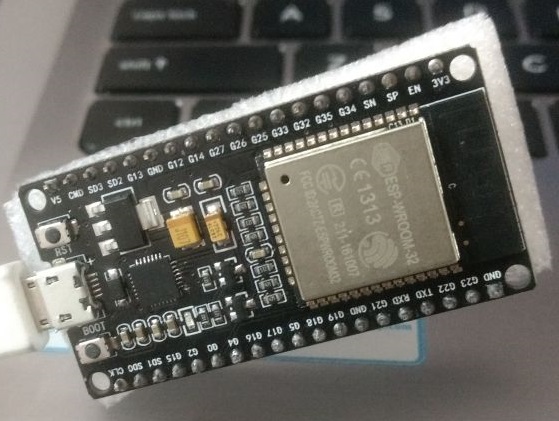
Thanks for a good tutorial which is easy to follow and I am having the same board as you show on your blok.
I have made the installation of installed the ESP32 Arduino Core as mentioned, however under File => Preferences =>Sketchbook location is C:\Users\Thomas\Documents\Arduino\hardware\espressif\esp32\librairies
Is that correct after \Arduino ?
Board has been set to ESP32 Dev Module and com port is right.
When trying to upload the GetChipID sketch the following comes up;
Arduino: 1.8.8 (Windows 10), Board: “ESP32 Dev Module, Disabled, Default, 240MHz (WiFi/BT), QIO, 40MHz, 4MB (32Mb), 115200, None”
C:\Program Files (x86)\Arduino\arduino-builder -dump-prefs -logger=machine -hardware C:\Program Files (x86)\Arduino\hardware -hardware C:\Users\Thomas\AppData\Local\Arduino15\packages -tools C:\Program Files (x86)\Arduino\tools-builder -tools C:\Program Files (x86)\Arduino\hardware\tools\avr -tools C:\Users\Thomas\AppData\Local\Arduino15\packages -built-in-libraries C:\Program Files (x86)\Arduino\libraries -libraries C:\Users\Thomas\Documents\Arduino\hardware\espressif\esp32\librairies\libraries -fqbn=esp32:esp32:esp32:PSRAM=disabled,PartitionScheme=default,CPUFreq=240,FlashMode=qio,FlashFreq=40,FlashSize=4M,UploadSpeed=115200,DebugLevel=none -ide-version=10808 -build-path C:\Users\Thomas\AppData\Local\Temp\arduino_build_902636 -warnings=none -build-cache C:\Users\Thomas\AppData\Local\Temp\arduino_cache_397327 -prefs=build.warn_data_percentage=75 -prefs=runtime.tools.xtensa-esp32-elf-gcc.path=C:\Users\Thomas\AppData\Local\Arduino15\packages\esp32\tools\xtensa-esp32-elf-gcc\1.22.0-80-g6c4433a-5.2.0 -prefs=runtime.tools.xtensa-esp32-elf-gcc-1.22.0-80-g6c4433a-5.2.0.path=C:\Users\Thomas\AppData\Local\Arduino15\packages\esp32\tools\xtensa-esp32-elf-gcc\1.22.0-80-g6c4433a-5.2.0 -prefs=runtime.tools.mkspiffs.path=C:\Users\Thomas\AppData\Local\Arduino15\packages\esp32\tools\mkspiffs\0.2.3 -prefs=runtime.tools.mkspiffs-0.2.3.path=C:\Users\Thomas\AppData\Local\Arduino15\packages\esp32\tools\mkspiffs\0.2.3 -prefs=runtime.tools.esptool_py.path=C:\Users\Thomas\AppData\Local\Arduino15\packages\esp32\tools\esptool_py\2.6.0 -prefs=runtime.tools.esptool_py-2.6.0.path=C:\Users\Thomas\AppData\Local\Arduino15\packages\esp32\tools\esptool_py\2.6.0 -verbose C:\Users\Thomas\AppData\Local\Arduino15\packages\esp32\hardware\esp32\1.0.1\libraries\ESP32\examples\ChipID\GetChipID\GetChipID.ino
Board esp32 (platform esp32, package esp32) is unknown
Error compiling for board ESP32 Dev Module.
Hope you can assist in solving this.
Thanks for some good tutorials which are easy to follow.
I am new to coding and Arduino and is working with a board similar to the one on your block.
Installations has been done as you describe and the Board is set to ESP32 Dev Module and the COM port is also right.
When trying to run the GetChipID Sketch the following is coming up;
Arduino: 1.8.8 (Windows 10), Board: “ESP32 Dev Module, Disabled, Default, 240MHz (WiFi/BT), QIO, 40MHz, 4MB (32Mb), 115200, None”
C:\Program Files (x86)\Arduino\arduino-builder -dump-prefs -logger=machine -hardware C:\Program Files (x86)\Arduino\hardware -hardware C:\Users\Thomas\AppData\Local\Arduino15\packages -tools C:\Program Files (x86)\Arduino\tools-builder -tools C:\Program Files (x86)\Arduino\hardware\tools\avr -tools C:\Users\Thomas\AppData\Local\Arduino15\packages -built-in-libraries C:\Program Files (x86)\Arduino\libraries -libraries C:\Users\Thomas\Documents\Arduino\hardware\espressif\esp32\librairies\libraries -fqbn=esp32:esp32:esp32:PSRAM=disabled,PartitionScheme=default,CPUFreq=240,FlashMode=qio,FlashFreq=40,FlashSize=4M,UploadSpeed=115200,DebugLevel=none -ide-version=10808 -build-path C:\Users\Thomas\AppData\Local\Temp\arduino_build_902636 -warnings=none -build-cache C:\Users\Thomas\AppData\Local\Temp\arduino_cache_397327 -prefs=build.warn_data_percentage=75 -prefs=runtime.tools.xtensa-esp32-elf-gcc.path=C:\Users\Thomas\AppData\Local\Arduino15\packages\esp32\tools\xtensa-esp32-elf-gcc\1.22.0-80-g6c4433a-5.2.0 -prefs=runtime.tools.xtensa-esp32-elf-gcc-1.22.0-80-g6c4433a-5.2.0.path=C:\Users\Thomas\AppData\Local\Arduino15\packages\esp32\tools\xtensa-esp32-elf-gcc\1.22.0-80-g6c4433a-5.2.0 -prefs=runtime.tools.mkspiffs.path=C:\Users\Thomas\AppData\Local\Arduino15\packages\esp32\tools\mkspiffs\0.2.3 -prefs=runtime.tools.mkspiffs-0.2.3.path=C:\Users\Thomas\AppData\Local\Arduino15\packages\esp32\tools\mkspiffs\0.2.3 -prefs=runtime.tools.esptool_py.path=C:\Users\Thomas\AppData\Local\Arduino15\packages\esp32\tools\esptool_py\2.6.0 -prefs=runtime.tools.esptool_py-2.6.0.path=C:\Users\Thomas\AppData\Local\Arduino15\packages\esp32\tools\esptool_py\2.6.0 -verbose C:\Users\Thomas\AppData\Local\Arduino15\packages\esp32\hardware\esp32\1.0.1\libraries\ESP32\examples\ChipID\GetChipID\GetChipID.ino
Board esp32 (platform esp32, package esp32) is unknown
Error compiling for board ESP32 Dev Module.
I have looked at all setting which seam to be correct so can you help me with where I go wrong?
Thanks in advance.
thanks alot. this was helpful to me
I followed through with your tutorial. The explanation is very easy and simple to implement but yet I am unable to upload the code. I am not sure whats the problem my ide is not able to identify the esp 32 chip at all!
Below is the error message its providing.
Failed uploading: no upload port provided
I have got the latest Arduino IDE, which is v2.2.1.
please verify that you selected the COM port