Arduino : Connecting Arduino UNO with ESP8266
We have already seen how to connect Arduino UNO with NodeMCU/ESP8266 over UART and send data to MQTT broker here. That project uses lua to program the NodeMCU devices, to make it simple to use I will use Arduino IDE to program both the devices in this post.
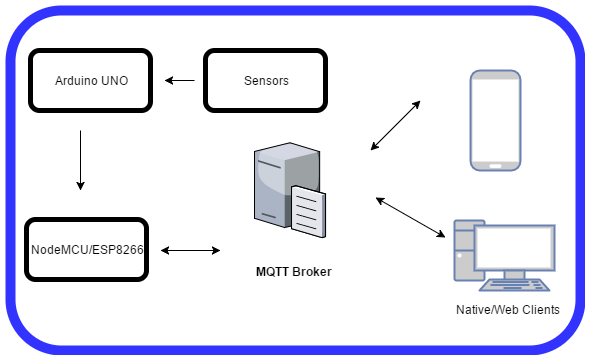
What we are trying to achieve is simple, Arduino UNO generates some data (may be sensor readings) and we want to send that to cloud (in this case MQTT broker). Since Arduino UNO doesn’t have any network capabilities we need to device that can do networking for us, whats better than ESP8266. To send data from Arduino UNO to ESP8266 we will use UART.
Environment requirements:
- you need to have UNO and ESP8266/NodeMCU
- you would also need a 5v to 3v3 level converter to convert the UART signal levels. (Note: most of the nodemcu devices work fine without a level converter. I am not showing the level converter in the circuit diagrams, if you want to use refer this post for connection diagram)
- setup your Arduino IDE to program NodeMCU
- Arduino libraries : PubSubClient (if you haven’t already installed it , you can install it from Sketch->Include library->Manage Libraries)
- mqtt broker , if you don’t have one you can use eclipse Paho broker for experimentation (host: iot.eclipse.org , port : 1883, it is a free and open broker)
Solution Approach:
We will push the data received on serial line on “/ic/nm/serialdata/uno/” channel/topic. You can view the data sent by the UNO on any MQTT client by subscribing to the topic “/ic/nm/serialdata/uno/“, I also embedded MQTT client at the end of this blog, scroll down to see it. Put your Broker details (if you don’t have a broker you can use the defaults and click on connect, when ever UNO sends a new message it should appear here)
First we will write program Arduino UNO to generate data periodically and send it on serial line to NodeMCU.
Arduino UNO code:
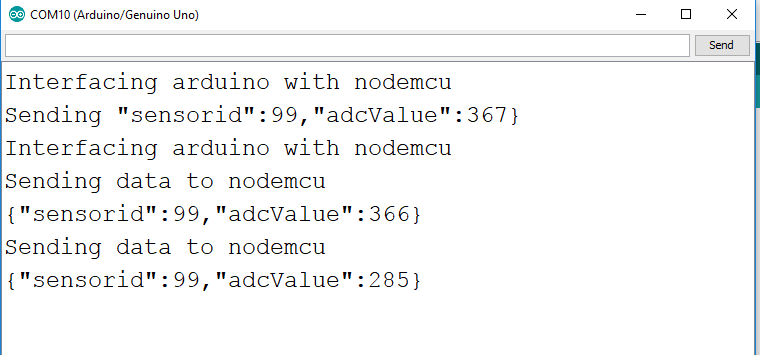
We setup a SoftSerial on pins 2,3 (Rx,Tx) and read a analog pin every five seconds. Put this data into JSON format and send it SoftSerial. Pretty much this is what the following code does. You can send any data over the Serial line not limited to JSON format. Only requirement is that each message should be terminated by newline character. If your data has newline characters, you can choose your own and change the NodeMCU code accordingly. We are using 115200 baud rate on softserial as well, at times you may see garbage on MQTT channel depending how the connections are made, you can reduce the baud rate on both Arduino UNO and NodeMCU and try again (Both Arduino UNO baud rate and NodeMCU baud rate should be same )
NodeMCU Code:
NodeMCU code does the following
- setup UART
- connect to configured access point
- connect to MQTT broker
- read data from UART channel until a newline character appears, then send the message to MQTT broker
How To Test:
Load the code shown above to UNO and NodeMCU.
Connect UNO to system and open serial console. You should see something like the following
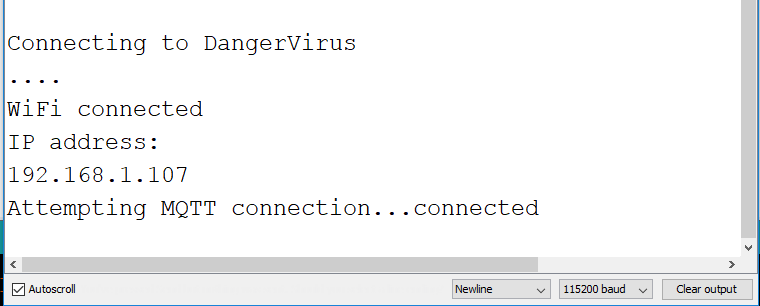
Connect NodeMCU and change the COM port appropriately. Open serial console, it should print IP after connecting to Access point
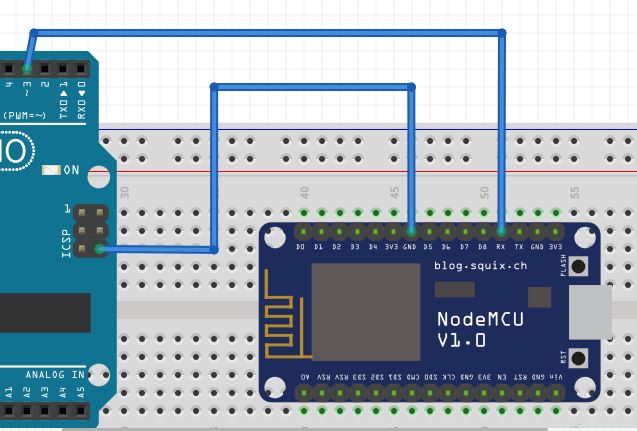
If both boards are working as expected, we can connect them together now. Connect Arduino UNO pin 3 to the Rx pin of NodeMCU.
Click on Connect button below and power up both boards,you should see the messages below or in your MQTT Clinet.
——————————————————————–
——————————————————————–


i want to send arduino data to thingSpeak using node mcu
so plz explain what i need to do, what farther code i need to modify from above code.
You need to modify nodemcu code to send the data to ThingSpeak instead of MQTT broker
have you modified this code?
Please modify this code for thingspeak.
Sir, I need help. I want to send 3 analog data from Arduino to nodemcu and make it in serial. example, make it Arduino Uno as slave and nodemcu as master so that data can be transfer. So, how to modify the code, how to add the three sensors in the code?
you have done exellent post very helpful for me but i want to send data in google firebase so what i have to do for this plz reply my question
you can try firebase REST api
Hi sir,
thanks for your explanation. i have just started with arduino & nodeMCU. My DHT11 & HC-SR05 connected to arduino uno (Pin 2,3 & 4). i want to see the distance, temp & Humidity on Blynk. Blynk is communicating with nodeMCU. so please post the code of arduino & nodeMCU over arduino IDE software.
Hello…. Thank you for posting a great blog I am just confused about one thing that I want to send my data to adafruit cloud which has its API key so if I modify this nodemcu code according to my cloud where should I post my API key in this code
Hi Sankar,
Thanks for writing these posts, they are quite helpful. However, when I tried to run your code using an account I created on CloudMQTT, which was recommended in your, “Getting started with MQTT using nodeMCU”, I was getting the error, “Attempting MQTT connection…failed, rc=-2 try again in 5 seconds”. Do you know what could be causing this? I also can’t seem to get the broker to read in mqtt-spy.
Hi,
Might be your cloud mqtt account is configured properly, you can try the iot.eclipse.org to see if your setup is correct
Hi Shankar,
I am using Arduino Mega2560 for reading sensors and want to use ESP32 for the wifi so that I can send data to ThingSpeak.
Bit new to this field.
Any help on how to connect the Arduino mega2560 with ESP32 and basic code to send the sensor data to ThingSpeak using ESP32 wifi would be of great help.
Appreciate your help.
Regards,
The blog contents start with “NodeMCU/ESP8266”, but it ends with only NodeMCU.
I am using ESP8266, what changes I need to make in this program? As I am not able execute this in my setup. Your help will be appreciated.
This is not working in case of ESP8266 instead of NodeMCU. Can you help me out with ESP8266 via Arduino UNO?
Please,
How change the broker connection parameters without code change? I have them in a string variable..how call the function if it using const char*?
Thank you for posting this concise how-to. I have a question about the connections. You are connecting to the D3 of the Arduino Uno. Why? Are there other options here? I have sensors connected and the digital pins I have available to use are: 4, 7, 8, 11, 12, and 13. Can I use one of those and which would be best? Again, thank you very much for your work.
Hi, Yeah You can use other digital pins. You can configure it using soft serial initialisation code (line number 4 in uno code)
Sir, I need help. I want to send analog data from Arduino (tempearture values from 2 thermistors) to nodemcu. Via the nodemcu and the Blynk application, I want to monitor both temperature reading.
Please can someone help me?
PS: the temperature values are the water temperature from my floor heating