Arduino: Connecting NodeMCU to MQTT Broker
We can program NodeMCU (ESP8266) in several ways. Most of the times I use it with lua (with nodemcu firmware inside it). We can also program NodeMCU hardware using Arduino IDE. we have already seen how to program NodeMCU from Arduino IDE in this post. In this post we will see how to connect NodeMCU with a MQTT broker. We will also learn how to send messages to MQTT broker from NodeMCU and how to receive messages from MQTT broker.
Environment requirements:
- you need to have a NodeMCU (any ESP8266 module would do)
- setup your Arduino IDE to program NodeMCU/ESP8266
- Arduino libraries : PubSubClient,ArduinoJson (if you haven’t already installed it , you can install it from Sketch->Include library->Manage Libraries)
- mqtt broker , if you don’t have one you can use eclipse Paho broker for experimentation (host: iot.eclipse.org , port : 1883, it is a free and open broker. Also it does not require any username and password)
Solution Approach :
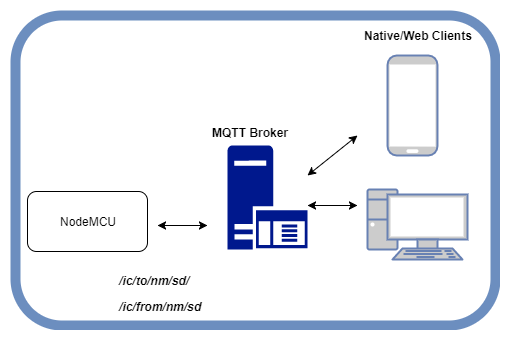
Our Node MCU will listen on topic “/ic/to/nm/sd/” for incoming messages. It will print any message received on this topic to serial console. The applications that want to listen for the messages sent from NodeMCU should listen on topic “/ic/from/nm/sd/“. If we send something from the Serial console to NodeMCU that message will be published to this topic.
NodeMCU MQTT Code :
On setup function we will try to connect to access point. Once we are connected to access point we will connect to given MQTT broker and subscribe to “/ic/to/nm/sd/” channel. Messages published to this channel will be printed on our serial console. All the messages sent from serial console will be published to “/ic/from/nm/sd/’.
setup_wifi() method takes care connecting NodeMCU to WiFi (Access point). This is blocking method, means it will only return after NodeMCU connects to WiFi.
reconnect() method takes care of connecting to MQTT broker and subscribing to the topics. If there is a new message on the subscribed topic, our callback method will be called by pubsub library.
To send a message on the MQTT topic, we need to call publishSerialData() method with the message
Upload the following code to NodeMCU. Don’t forget to change the network and MQTT broker details before uploading.if you are using eclipse mqtt broker, no need of any username/password.
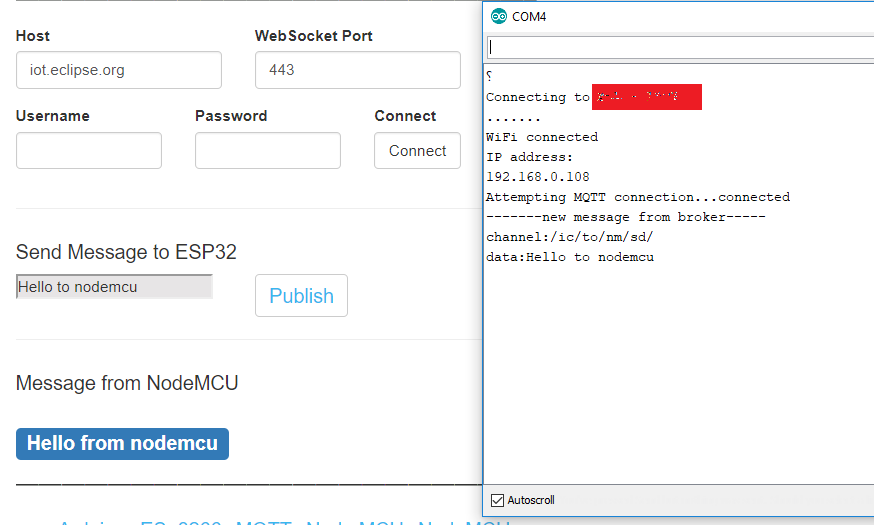
Test the connection straight from this page:
In order to make the testing easier,I built the code using react.js. Thus you can test the MQTT and NodeMCU/ESP8266 connectivity from the below interface (click on connect button).
Step 1 :connect NodeMCU to system and load the code.
Step2 :Open serial console, if every thing goes well it will print the WiFi name you have given in the code. (pressing reset , if nothing comes on serial monitor)
Step 3: you can send and receive messages to NodeMCU right from this page, click on “Connect”in the below form
(if you are using broker other than eclipse, provide the details in the respective fields).
Step4 : If the connection is successful you will see a text field, enter your message and click on “Send” it should appear in the serial console. If you send any message from the serial console , the message should appear here
——————————————————————–
——————————————————————–


Nice article. Keep writing. Good initiative. This will help others learn the micro and the code and protocol.
Thank you so much for the appreciation
Hi sankar…
I am able to send my nodemcu data to public broker iot.eclipse.org. But now iam having troubles in sending the same data to a database created in xampp. I really dont know what should i change in the above program, like the serial and publish channels. Could you suggest me a post for this. Appreciate a reply.
is there any possible using cloud mqtt ???
hellohello, I want to ask about mqtt, if in the serial monitor there is a message failed with state -2 why? and the solution is to be able to connect with MQTT Brokers, thank you
i need to convert http code arduino json v5 to mqtt arduinojson v6 ..how can i ??